
Developing BangkokRail.com


I commuted to school via train for about 2 years, which was at the intersection of BTS, MRT, and the Airport Link railway system. Most of my friends also commuted via train too, and we would go out to places around Bangkok with either the BTS, MRT, or Airport Link.
Whenever my friends and I would travel anywhere, we always wondered about the optimal route since there were a lot railway systems to pick around Asok. We had to compare the price, duration, and number of interchanges. It was especially difficult to estimate the duration if we changed railway systems since each railway operator’s website only provides trip information for their own railway stations.
This is what sparked the idea for Bangkok-Rail.
Development
Working in the Console
I initially started by creating a simple console application. As you can see in the example below, it printed out every valid route, not the shortest one; It didn’t even do it very efficiently. This was just to test out a theory though.
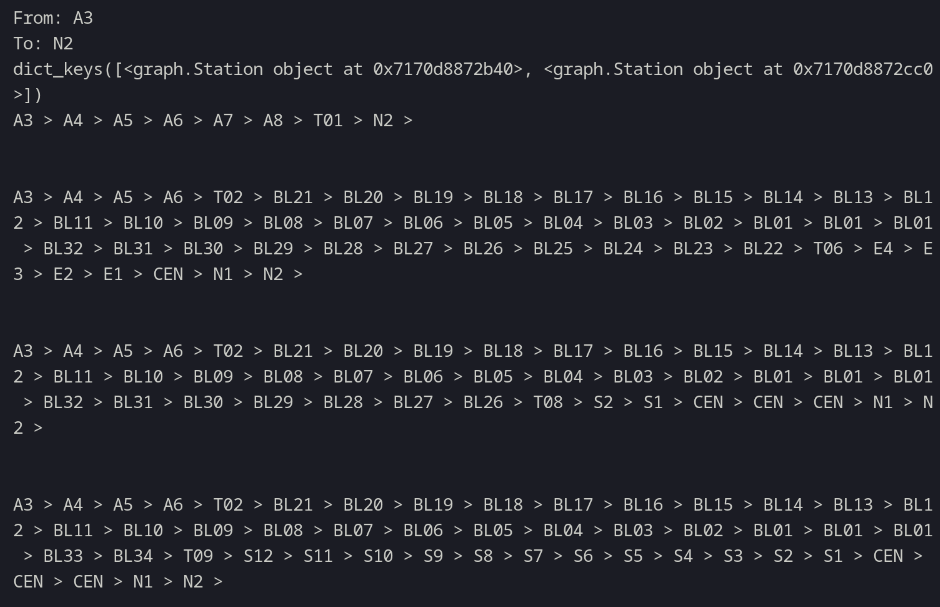
After a month of research, updates, and learning about a library called NetworkX, I was able to find the optimal route and calculate the duration of a trip! The pathfinder uses Dijkstra’s algorithm to find the shortest path.

Building the Website
Since I already have the pathfinder logic written in Python, I decided to develop the website using the Django framework which also uses Python. I started off by developing the UI for the main page. The first thing I did was setup the database and the .csv data import. After that, I began using the data stored in the database to find the nearest route. I also used basic HTML & CSS to draft up a basic main page.
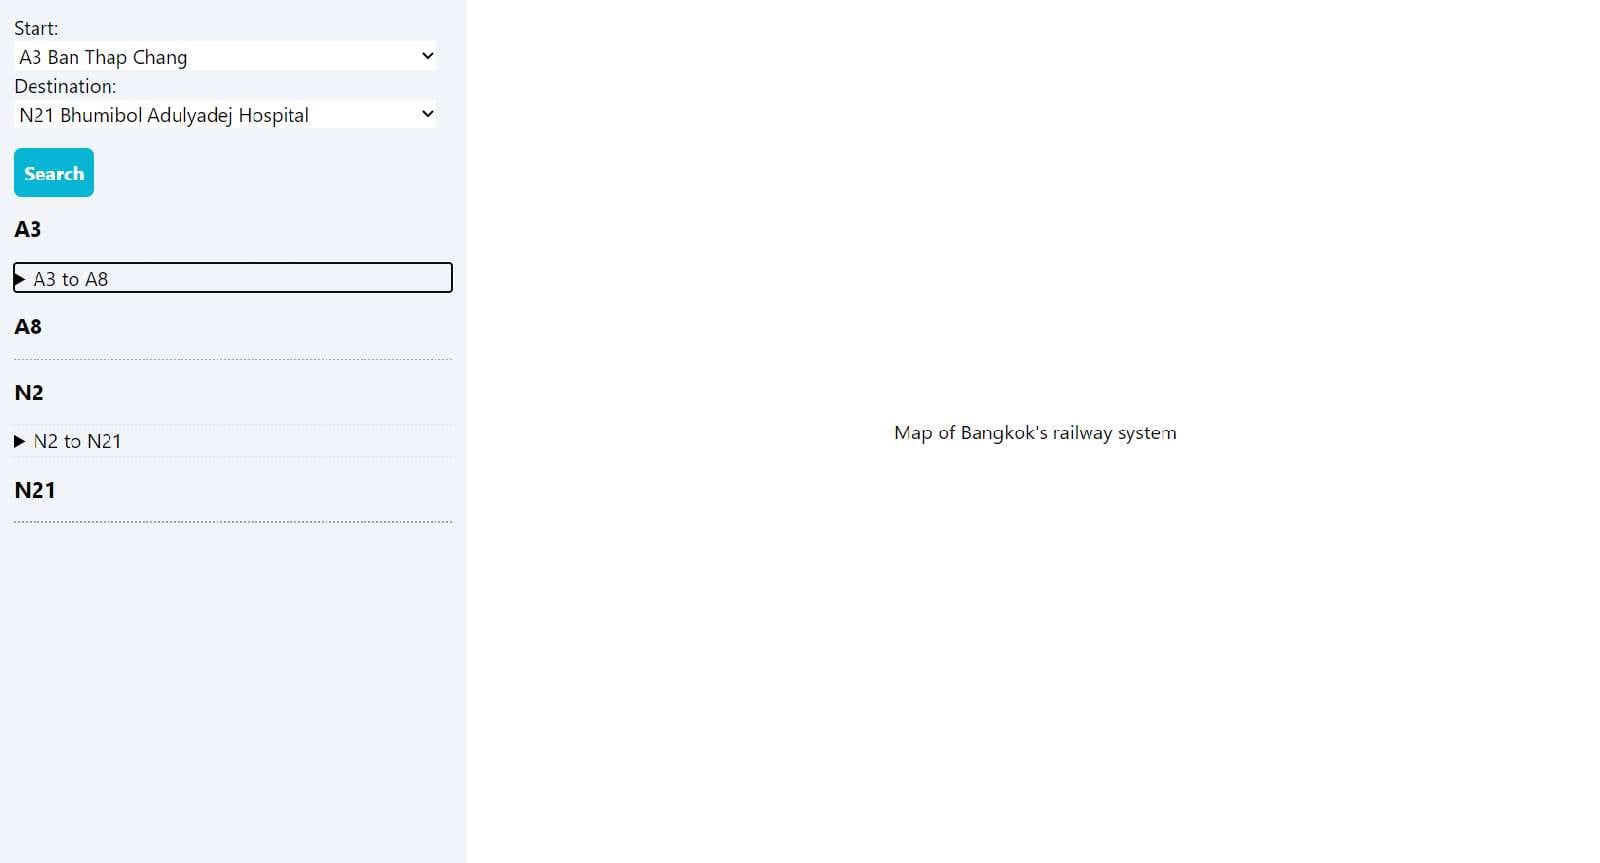
From the image above, you can see that the website was really simple and had many issues. It didn’t work on mobile screens, there was no way to navigate between pages, the map didn’t exist, stations didn’t have a name, and there was no clear “theme” or direction for the user interface. But at this stage, just getting the website to run properly was a lot of work. And I wasn’t sure if this would even be possible.
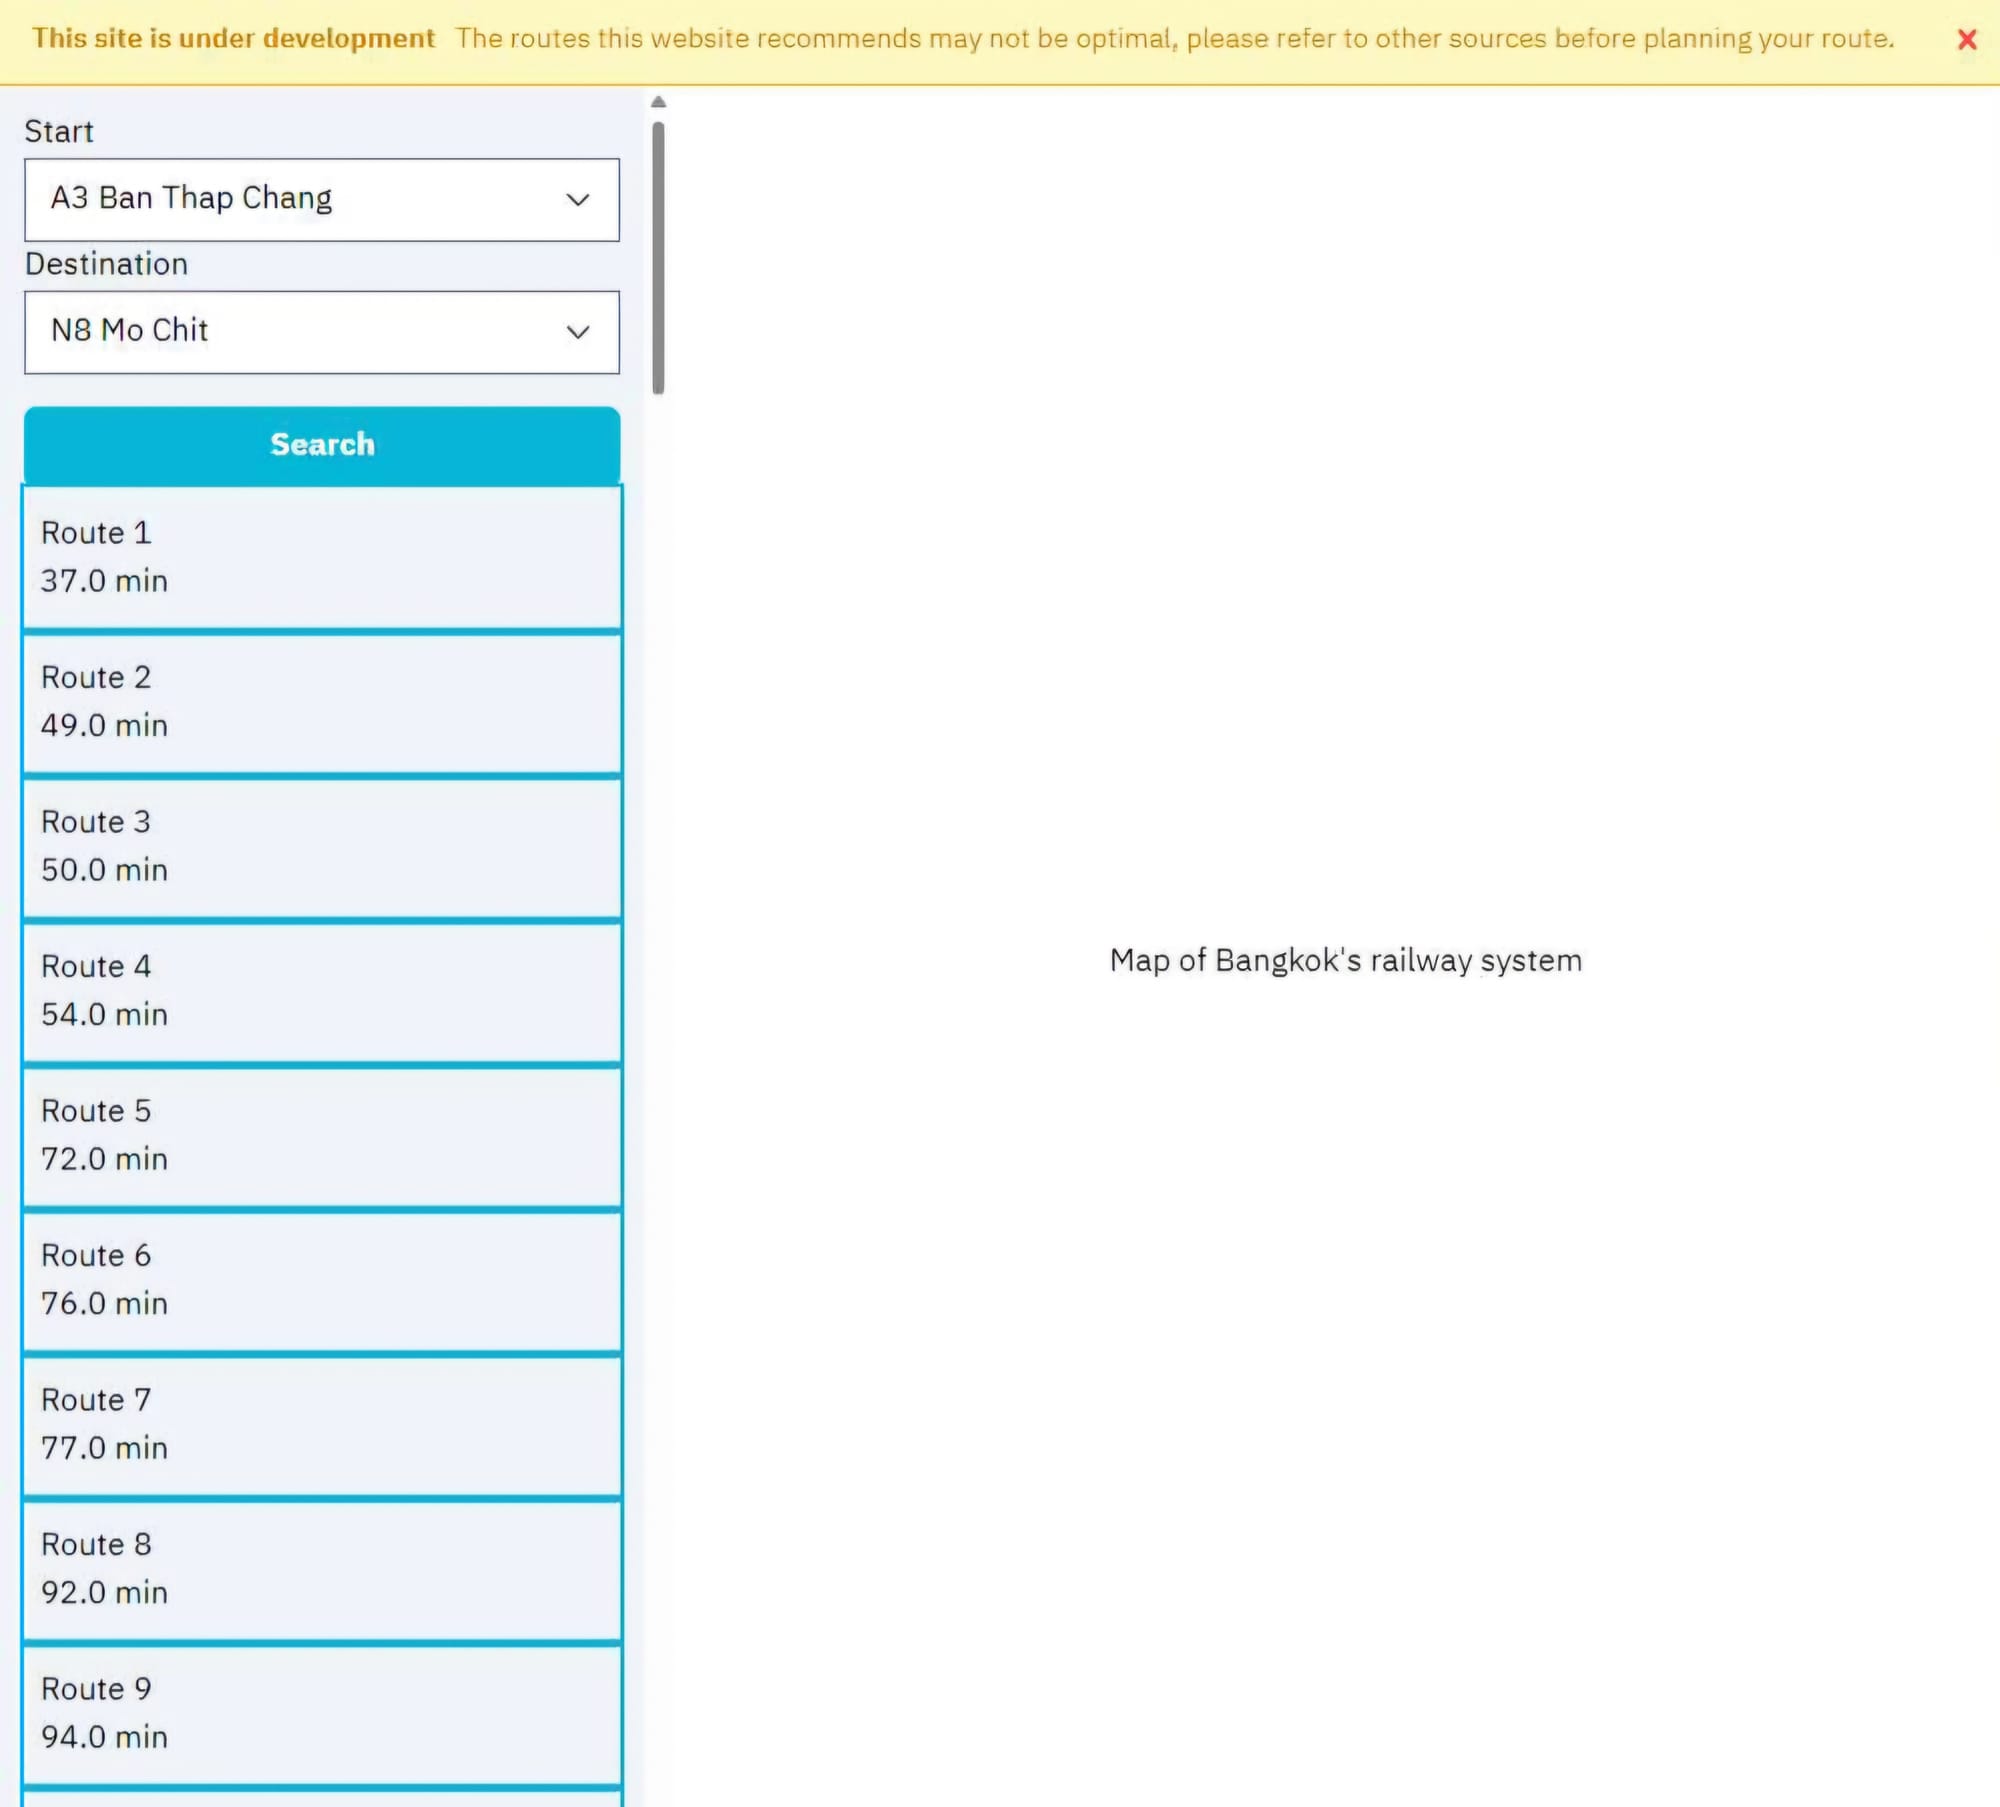
I then worked on enhancing the UI. I used TailwindCSS for the first time to touch up the route finder page. I also made it recommend multiple routes since the fastest route may not necessarily be the most optimal. Again, hardly the nicest UI, but it was starting to have more of a structure.
A few road blocks
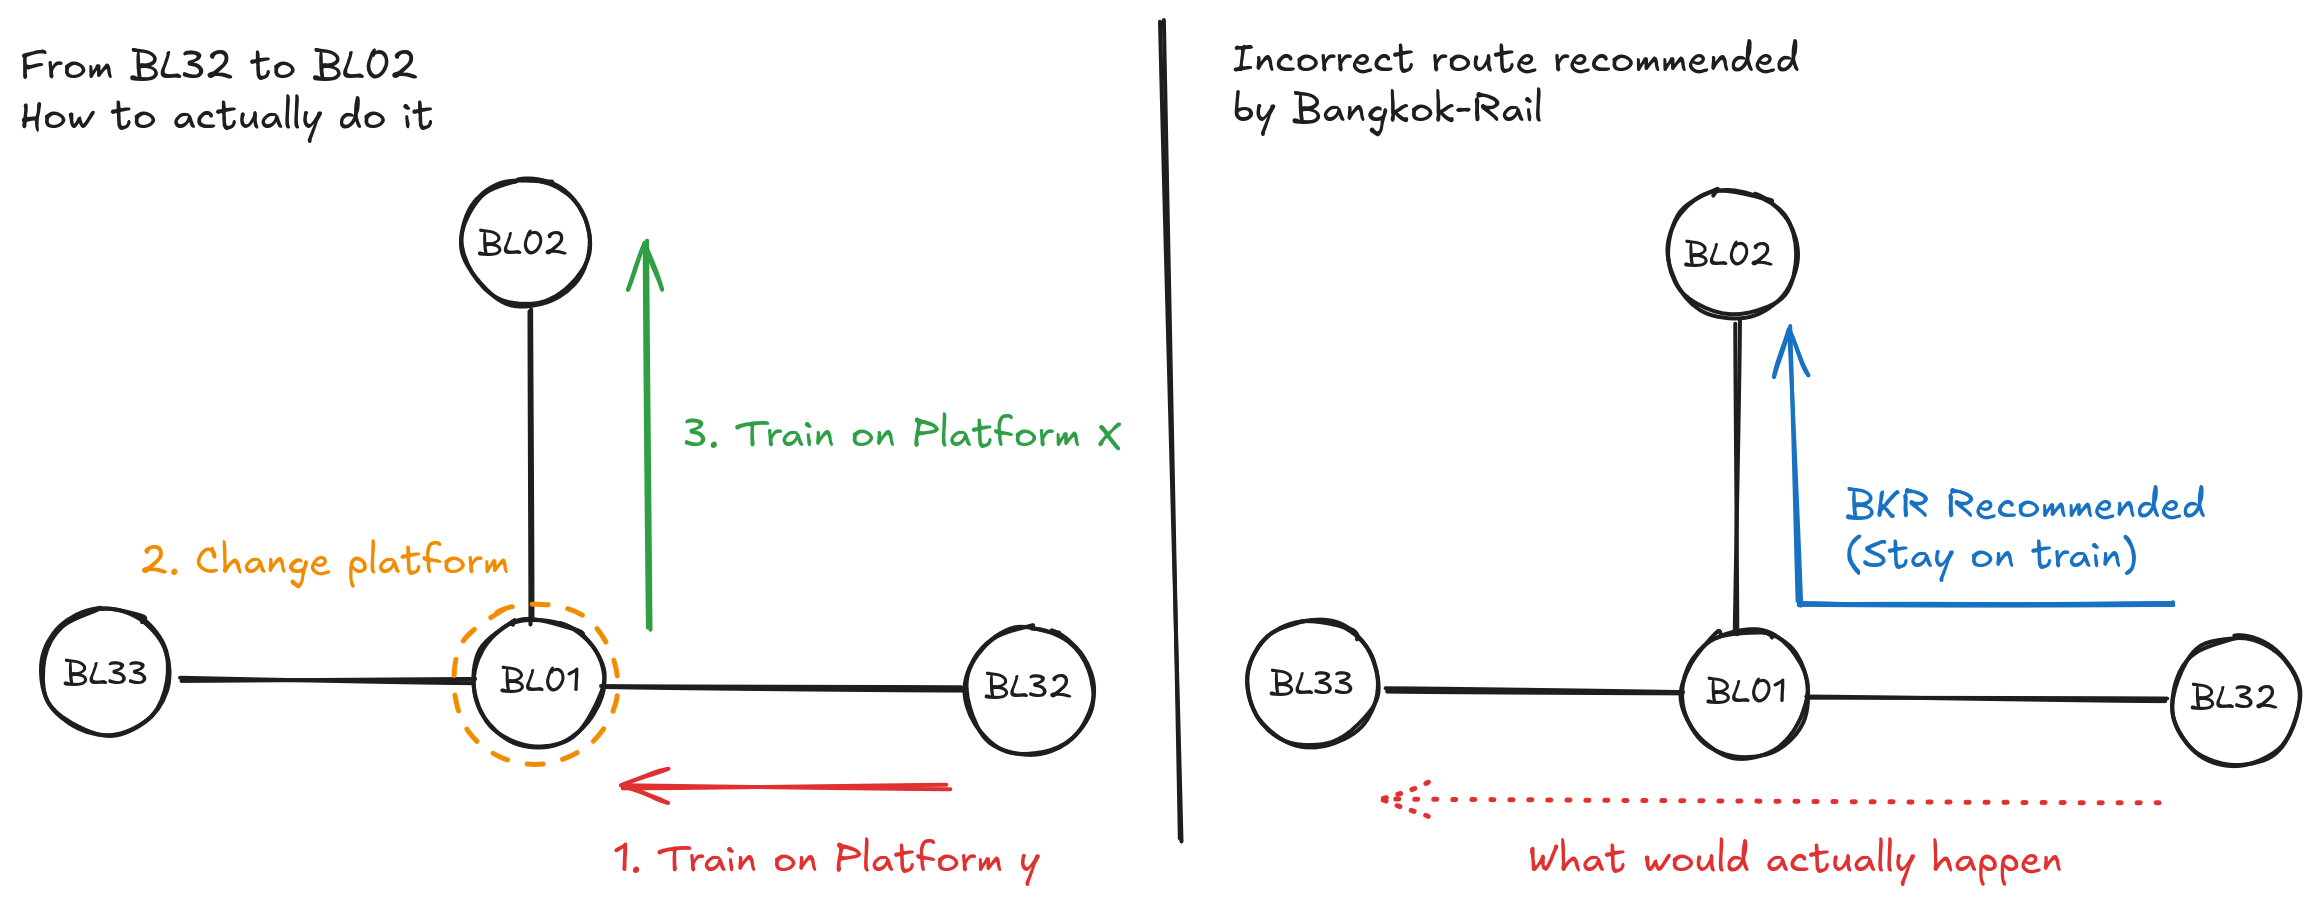
I did think about how to implement and represent the railway data in the database, but after implementing it, I discovered an issue. When I was still drafting the data structure, I made sure to consider the rail lines, railway operators, and stations. Unfortunately, I failed to consider one thing: Platforms. You may be wondering why it’s important, and my answer is BL01. BL01, or Tha Phra station is part of the MRT Blue Line, which runs in a loop that intersects itself at Tha Phra station.
The issue stems from how Bangkok-Rail determines when to change trains. I initially designed it to change when the line changes. This isn’t an issue with the BTS because when you change platforms at Siam, you’re also changing lines (Although this does cause another issue I will discuss later). With BL01, when you change platforms, you’re still on the Blue line, which means that Bangkok-Rail incorrectly recommends to stay on the train.
One way I thought to fix this issue was to create a new Platform field, so instead of connecting routes between stations, we connect routes between platforms, and stations can contain platforms. This presented more issues than it solved though, since there was no way for me to know what platform each train takes, and it added unnecessary complexity since I was changing the whole structure just to deal with 1 edge case. So I went back to the drawing board and found another solution: Platform Nodes
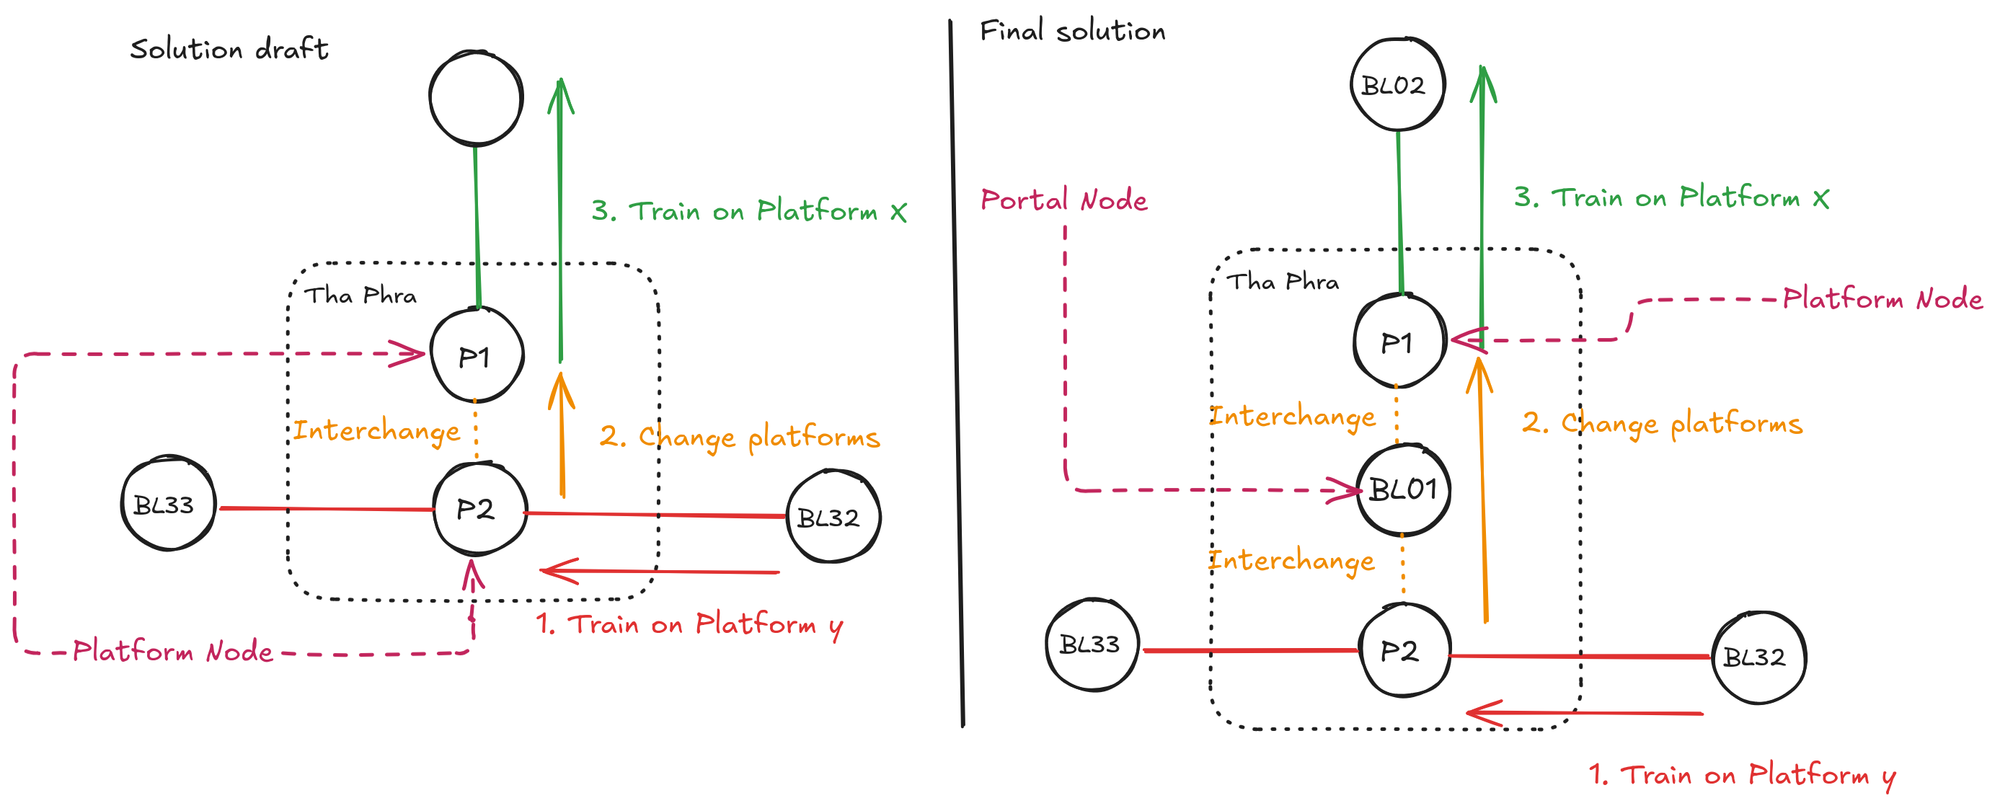
Creating a platform node is like creating 2 “fake” stations (P1 & P2 in the image below) connected with the “Interchange” relationship, which tells Bangkok-Rail to change trains. This presented another issue that can be seen in the Siam example previously. When selecting stations, that list includes all the stations, including:
- CEN (Light Green)
- CEN (Dark Green)
- BL01 (P1)
- BL01 (P2)
If you look at the list above, you can see that the list includes the same station twice. The user should only select the station, not the containing platform. This issue is easily solved by creating a Portal Node connected to the nodes listed above. (As seen in the Final Solution below). I then automatically filter out the portal node from the route, while keeping the platform nodes. I also filter out the platform nodes from the station selection.
Below is a table that summarizes the properties for the 3 types of nodes.
| Properties | Station Node | Portal Node | Platform Nodes |
|---|---|---|---|
| Included in the Station selection list | ✅ | ✅ | ❌ |
| Included in the route finder path | ✅ | ❌ | ✅ |
Cost of travel
Okay, now that path finding is out of the way, let’s continue with cost. The cost of travel is easy to calculate, but before I can explain, you will have to see how the cost data is collected, and how the route finder path is structured. BTS and MRT publish their prices as a table. I import this into an excel spreadsheet via a combination of OCR, Copy & Paste, and manual data entry.
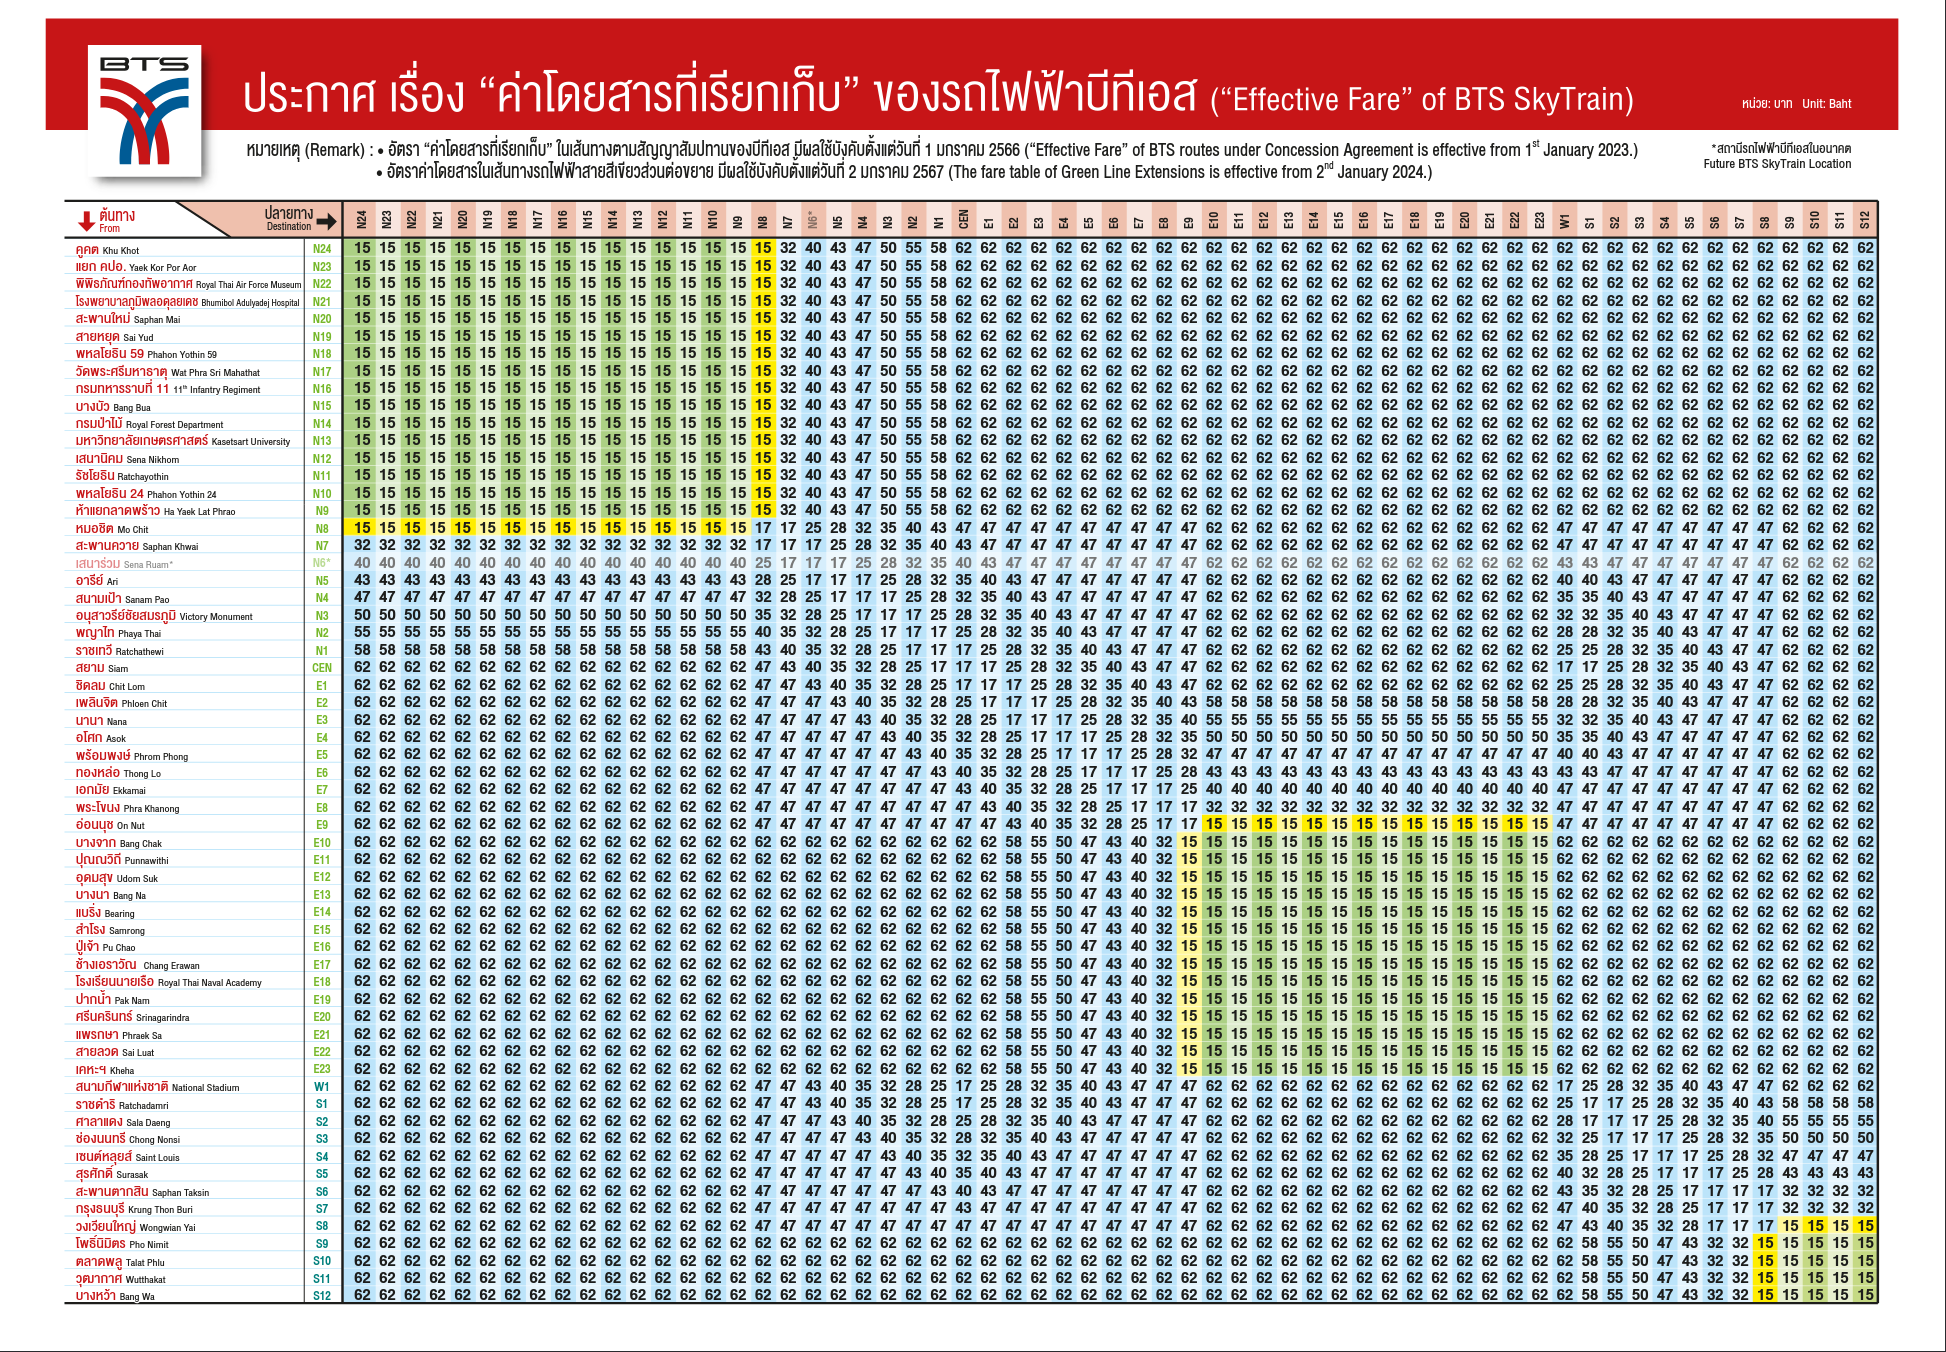
Example of BTS cost table