Self-hosting La Suite Docs with Docker


La Suite Docs is an open source collaborative writing platform created by the French (DINUM) and German (ZenDiS) governments. Docs is completely open source and is a great choice for collaborative note taking and documentation.

Docs has many useful features, whether it be:
- Live editing & collaborative writing
- File versioning
- Slash commands
And it's all in one beautiful package. Now, let's get into the setup.
Setting it up
Docs was one of the harder pieces of software to self-host, mainly due to the lack of documentation and the fact that it wasn't initially built for self-hosting at home. Fortunately, the team at Docs is about to merge a pull request for better documentation on the matter. But the documentation isn't made in a linear way and makes no assumptions on how your setup works. This makes the documentation more inclusive but also more difficult to follow.
This guide is a product of many months setting up, looking through numerous documentation, looking at discussions in the Docs Matrix server, and following the documentation PR. My documentation will be easier to follow, but if you want to make many edits or have very specific requirements, you should consult the original documentation.
Okay, let's get into this.
Requirements
- Docker
- An authentication provider (e.g. Authentik, Keycloak)
- A reverse proxy
Docker compose
compose.yaml
You can copy the docker compose file and make sure to edit the MINIO_ROOT_USER and MINIO_ROOT_PASSWORD to your preference.
services:
  postgresql:
    container_name: docs_db
    image: postgres:16
    healthcheck:
      test: ["CMD-SHELL", "pg_isready -d $${POSTGRES_DB} -U $${POSTGRES_USER}"]
      interval: 1s
      timeout: 2s
      retries: 300
    env_file:
    - env.d/postgresql
    - env.d/common
    environment:
    - PGDATA=/var/lib/postgresql/data/pgdata
    volumes:
    - /data/docs/backend:/var/lib/postgresql/data/pgdata

  redis:
    container_name: docs_redis
    image: redis:5

  backend:
    container_name: docs_backend
    image: lasuite/impress-backend:latest
    user: ${DOCKER_USER:-1000}
    restart: always
    environment:
    - DJANGO_CONFIGURATION=Production
    env_file:
    - env.d/common
    - env.d/backend
    - env.d/yprovider
    - env.d/postgresql
    healthcheck:
      test: ["CMD", "python", "manage.py", "check"]
      interval: 15s
      timeout: 30s
      retries: 20
      start_period: 10s
    depends_on:
      postgresql:
        condition: service_healthy
        restart: true
      redis:
        condition: service_started

  y-provider:
    container_name: docs_yprovider
    image: lasuite/impress-y-provider:latest
    user: ${DOCKER_USER:-1000}
    env_file:
    - env.d/common
    - env.d/yprovider

  frontend:
    container_name: docs_frontend
    image: lasuite/impress-frontend:latest
    ports:
    - 8083:8083
    user: "101"
    entrypoint:
    - /docker-entrypoint.sh
    command: ["nginx", "-g", "daemon off;"]
    env_file:
    - env.d/common
    volumes:
    - /data/docs/nginx/default.conf.template:/etc/nginx/templates/docs.conf.template
    depends_on:
      backend:
        condition: service_healthy

  minio:
    container_name: docs_minio
    image: minio/minio
    environment:
    - MINIO_ROOT_USER=<MINIO USER>
    - MINIO_ROOT_PASSWORD=<MINIO PASS>
    healthcheck:
      test: ["CMD", "mc", "ready", "local"]
      interval: 1s
      timeout: 20s
      retries: 300
    entrypoint: ""
    command: minio server /data
    volumes:
    - /data/docs/minio:/data
compose.yaml
Environment variables
Docs uses multiple .env files to separate different variables based on what it's used for, you can also put it all into 1 .env file but I'll be following the official guide because I find it easier to read and debug issues.
Beside your compose.yaml file, create a folder named env.d and add the following files.
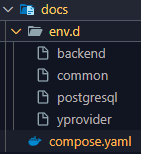
common
In this file, set DOCS_HOST with the domain your reverse proxy will use
DOCS_HOST=<YOUR_HOST> # docs.mydomain.com
S3_HOST=minio:9000
BACKEND_HOST=backend
FRONTEND_HOST=frontend
YPROVIDER_HOST=y-provider
BUCKET_NAME=docs-media-storage
REALM_NAME=docs
COLLABORATION_WS_URL=wss://${DOCS_HOST}/collaboration/ws/
common
postgresql
All you need to edit is the DB_PASSWORD
# App database configuration
DB_HOST=postgresql
DB_NAME=docs
DB_USER=docs
DB_PASSWORD=<DB_PASSWORD>
DB_PORT=5432

# Postgresql db container configuration
POSTGRES_DB=docs
POSTGRES_USER=docs
POSTGRES_PASSWORD=${DB_PASSWORD}
postgresql
yprovider
Edit Y_PROVIDER_API_KEY to your preference
Y_PROVIDER_API_BASE_URL=http://${YPROVIDER_HOST}:4444/api
Y_PROVIDER_API_KEY=<Y PROVIDER KEY>
COLLABORATION_SERVER_SECRET=${Y_PROVIDER_API_KEY}
COLLABORATION_SERVER_ORIGIN=https://${DOCS_HOST}
COLLABORATION_API_URL=https://${DOCS_HOST}/collaboration/api/
COLLABORATION_BACKEND_BASE_URL=https://${DOCS_HOST}
COLLABORATION_LOGGING=true
yprovider
backend
In the OIDC and mail section, edit the values to match your authentication and mail provider. Also, make sure to edit
- DJANGO_SECRET_KEY
- AWS_S3_ACCESS_KEY_ID, AWS_STORAGE_BUCKET_NAME to the values you set in the compose file
# Django

DJANGO_ALLOWED_HOSTS=${DOCS_HOST}
DJANGO_SECRET_KEY= # Generate key using https://djecrety.ir/
DJANGO_SETTINGS_MODULE=impress.settings
DJANGO_CONFIGURATION=Production

# Logging

# Set to DEBUG level for dev only

LOGGING_LEVEL_HANDLERS_CONSOLE=ERROR
LOGGING_LEVEL_LOGGERS_ROOT=INFO
LOGGING_LEVEL_LOGGERS_APP=INFO

# Python

PYTHONPATH=/app

# Mail

# DJANGO_EMAIL_HOST=<smtp host>
# DJANGO_EMAIL_HOST_USER=<smtp user>
# DJANGO_EMAIL_HOST_PASSWORD=<smtp password>
# DJANGO_EMAIL_PORT=<smtp port>
# DJANGO_EMAIL_FROM=<your email address>

#DJANGO_EMAIL_USE_TLS=true # A flag to enable or disable TLS for email sending.
#DJANGO_EMAIL_USE_SSL=true # A flag to enable or disable SSL for email sending.

DJANGO_EMAIL_BRAND_NAME="La Suite Numérique"
DJANGO_EMAIL_LOGO_IMG="https://${DOCS_HOST}/assets/logo-suite-numerique.png"

# Media

AWS_S3_ENDPOINT_URL=http://${S3_HOST}
AWS_S3_ACCESS_KEY_ID=<MINIO USER>
AWS_S3_SECRET_ACCESS_KEY=<MINIO PASS>
AWS_STORAGE_BUCKET_NAME=${BUCKET_NAME}
MEDIA_BASE_URL=https://${DOCS_HOST}

# OIDC

OIDC_OP_JWKS_ENDPOINT=
OIDC_OP_AUTHORIZATION_ENDPOINT=
OIDC_OP_TOKEN_ENDPOINT=
OIDC_OP_USER_ENDPOINT=
OIDC_OP_LOGOUT_ENDPOINT=
OIDC_RP_CLIENT_ID=
OIDC_RP_CLIENT_SECRET=
OIDC_RP_SIGN_ALGO=RS256
OIDC_RP_SCOPES="openid email"
#USER_OIDC_FIELD_TO_SHORTNAME
#USER_OIDC_FIELDS_TO_FULLNAME

LOGIN_REDIRECT_URL=https://${DOCS_HOST}
LOGIN_REDIRECT_URL_FAILURE=https://${DOCS_HOST}
LOGOUT_REDIRECT_URL=https://${DOCS_HOST}

OIDC_REDIRECT_ALLOWED_HOSTS=["https://${DOCS_HOST}"]

# AI

#AI_FEATURE_ENABLED=true # is false by default
#AI_BASE_URL=https://openaiendpoint.com
#AI_API_KEY=<API key>
#AI_MODEL=<model used> e.g. llama

# Frontend

#FRONTEND_THEME=mytheme
#FRONTEND_CSS_URL=https://storage.yourdomain.tld/themes/custom.css
#FRONTEND_FOOTER_FEATURE_ENABLED=true
#FRONTEND_URL_JSON_FOOTER=https://docs.domain.tld/contents/footer-demo.json
backend
Setting up internal proxy
Docs has many services and uses the nginx proxy internally to route requests to the correct service. Copy the volume mounted to /etc/nginx/templates/docs.conf.template in the frontend container. You will need to create the file at that directory and add the following content (If you didn't edit the compose file it would be at /data/docs/nginx/default.conf.template)
This part is where I kind of stray from the original documentation. I had issues with file upload and it was due to the default client_max_body_size value being too small. The original documentation also assumes that you're using an S3 provider that is accessible via HTTPS. MinIO uses HTTP by default and HTTPS setup isn't necessary since the data is only sent within internal docker network.
docs.conf.template
upstream docs_backend {
    server ${BACKEND_HOST}:8000 fail_timeout=0;
}

upstream docs_frontend {
    server ${FRONTEND_HOST}:3000 fail_timeout=0;
}

server {
    listen 8083;
    server_name localhost;
    charset utf-8;

    # Disables server version feedback on pages and in headers
    server_tokens off;

    # Allow larger files
    client_max_body_size 50M;

    proxy_ssl_server_name on;

    location @proxy_to_docs_backend {
        proxy_set_header Host $http_host;
        proxy_set_header X-Forwarded-For $proxy_add_x_forwarded_for;

        proxy_redirect off;
        proxy_pass http://docs_backend;
    }

    location @proxy_to_docs_frontend {
        proxy_set_header Host $http_host;
        proxy_set_header X-Forwarded-For $proxy_add_x_forwarded_for;

        proxy_redirect off;
        proxy_pass http://docs_frontend;
    }

    location / {
        try_files $uri @proxy_to_docs_frontend;
    }

    location /api {
        try_files $uri @proxy_to_docs_backend;
    }

    location /admin {
        try_files $uri @proxy_to_docs_backend;
    }
    location /static {
        try_files $uri @proxy_to_docs_backend;
    }

    # Proxy auth for collaboration server
    location /collaboration/ws/ {
        # Ensure WebSocket upgrade
        proxy_http_version 1.1;
        proxy_set_header Upgrade $http_upgrade;
        proxy_set_header Connection "Upgrade";

        # Collaboration server
        proxy_pass http://${YPROVIDER_HOST}:4444;

        # Set appropriate timeout for WebSocket
        proxy_read_timeout 86400;
        proxy_send_timeout 86400;

        # Preserve original host and additional headers
        proxy_set_header X-Forwarded-Proto https;
        proxy_set_header Origin $http_origin;
        proxy_set_header Host $host;
    }

    location  /collaboration/api/ {
        # Collaboration server
        proxy_pass http://${YPROVIDER_HOST}:4444;
        proxy_set_header Host $host;
    }

    # Proxy auth for media
    location /media/ {
        # Auth request configuration
        auth_request /media-auth;
        auth_request_set $authHeader $upstream_http_authorization;
        auth_request_set $authDate $upstream_http_x_amz_date;
        auth_request_set $authContentSha256 $upstream_http_x_amz_content_sha256;

        # Pass specific headers from the auth response
        proxy_set_header Authorization $authHeader;
        proxy_set_header X-Amz-Date $authDate;
        proxy_set_header X-Amz-Content-SHA256 $authContentSha256;

        # Get resource from Minio
        # Use HTTP
        proxy_pass http://${S3_HOST}/${BUCKET_NAME}/;
        proxy_set_header Host ${S3_HOST};

        # Don't need this because we're using HTTP
        # proxy_ssl_name ${S3_HOST};

        add_header Content-Security-Policy "default-src 'none'" always;
    }

    location /media-auth {
        proxy_pass http://docs_backend/api/v1.0/documents/media-auth/;
        proxy_set_header X-Forwarded-Proto https;
        proxy_set_header Host $host;
        proxy_set_header X-Real-IP $remote_addr;
        proxy_set_header X-Forwarded-For $proxy_add_x_forwarded_for;
        proxy_set_header X-Original-URL $request_uri;

        # Prevent the body from being passed
        proxy_pass_request_body off;
        proxy_set_header Content-Length "";
        proxy_set_header X-Original-Method $request_method;
    }
}
docs.conf.template
Setup reverse proxy
If you have an existing proxy, point it to the port exposed in the compose file. If you're using Traefik, it may automatically use port 8000 which is the frontend and not the internal proxy. You will have to set set the proxy to use port 8083, otherwise only the first page will work.
Starting it up
run docker compose up -d and the services should now start
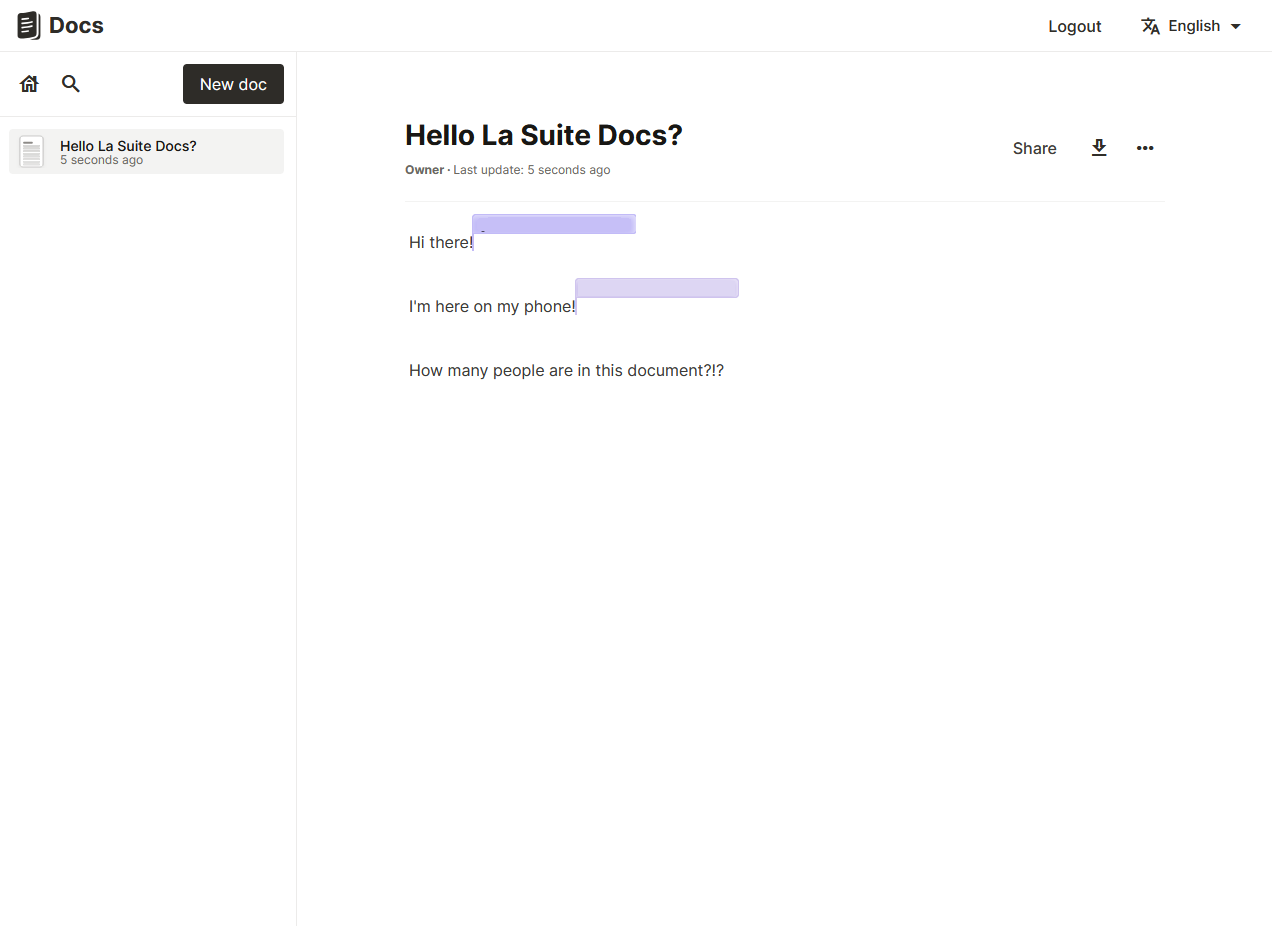
You should see a home screen, when you click Start Writing, you should be routed to your authentication solution, if not, make sure the internal proxy is correctly set up. After logging in you should see a 503 Server error, this is correct since we haven't done the extra configuration required.
Final configuration
Database migration
If you look at the logs you will find out that the database relation doesn't exist, you will have to run database migrations using the command below.
docker exec -it docs_backend python manage.py migrateInitialize MinIO storage
Now, you will be able to log-in and create files! Collaboration should also work, but none of the files will save properly, you will have to initialize the storage first.
Configure MinIO Client to connect to your MinIO instance
set MINIO_ROOT_USER, and MINIO_ROOT_PASSWORD to the value in docker compose
docker exec -it docs_minio mc alias set minio http://minio:9000 <MINIO_ROOT_USER> <MINIO_ROOT_PASSWORD>Create your bucket with the MinIO Client
Set BUCKET_NAME to the value set in env.d/common
docker exec -it docs_minio mc mb --with-versioning minio/<BUCKET_NAME>Congratulations 🎉
You have successfully set up Docs! You can now collaboratively create and manage documents with ease.
If you found this guide useful, have any feedback, or got stuck at any point--feel free to leave a comment below.